
Brick Books → Guides → Setting It Up
The steps that decide whether everything Brick Books calculates afterwards is right.
Open Set Up from the menu. Six steps, about ten minutes, once. They are the ones that decide how everything else is calculated. If you have bought a licence, you add the key under Licence & Help instead.
Most of it is telling Brick Books where your business operates and how you keep your books, because things like financial years, sales tax and business identifiers vary from one country to another.
Nothing is permanently locked in. If you are not sure about something, a sensible answer now is better than abandoning setup altogether.
Enter your trading name, country and business number, whatever your country happens to call it.
ABN, EIN, VAT number, company number or something else, it all goes in the same place. You also tell Brick Books what to call it, so the right label appears on your reports.
This is also where you choose your currency. Every figure throughout Brick Books is then shown in that currency.
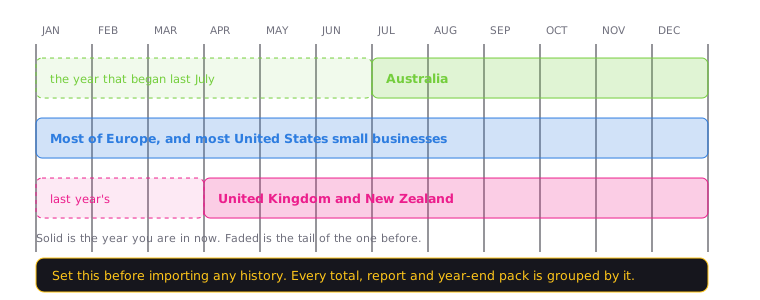
Choose the month your financial year begins.
This matters more than it might seem. Every total, report and end of financial year pack is grouped according to the financial year you set here.
For example:
If you are unsure which applies to your business, check with your accountant or tax authority rather than guessing.
You can change it later, and Brick Books will regroup your figures accordingly. But it is much less confusing to set it correctly before bringing in several years of transactions.
If your business is registered to collect GST, VAT, sales tax or an equivalent tax, turn it on here.
Tell Brick Books what your country calls it, the rate that applies to you, and the date your registration started.
Brick Books can then separate the tax component from relevant sales and purchases instead of treating the full amount as ordinary income or cost.
If you are not registered, leave it off and the sales-tax parts of Brick Books stay out of the way.
Tax treatment is worked out when an entry is recorded.
Changing your registration date later does not automatically recalculate entries that are already in your books. Those would need to be corrected individually, so it is worth getting this date right before importing your history.
Choose where Brick Books should file your receipts and other documents.
A folder that is already synchronised by a cloud service is usually the most practical choice. Your documents are then backed up and easy to reach from your phone, while the actual Brick Books data file stays on your own computer.
Add the places your business money lives, such as your bank account, PayPal and Stripe, along with what each account held on the date you are starting from.
Those opening balances are what make In Your Accounts on the Dashboard match your bank.
Without them, Brick Books can know what you have earned, but not what you actually have available. Those can be very different numbers when money is sitting in PayPal, stock has just been bought, or purchases are still sitting on a credit card.
Choose whether you record trips in kilometres or miles.
This only matters if you use a vehicle for things such as posting orders, collecting stock or other business travel.
That is the basic setup finished. Next: bring your existing books across, so you are not retyping a year of entries.